
Click picture to enlarge;) |
What you need:
Bulbs that naturalize multiply and spread each year. Not all bulbs will naturalize, and not all bulbs that will naturalize will do so in every climate. Your local garden center's bulb expert can help you choose bulbs that will naturalize in your locale. Typically, daffodils, crocus, and snowdrops will naturalize with ease. Tulips will not. |
Click picture to enlarge;) |
| A key to naturalizing bulbs is leaving the plant alone until it withers and yellows on its own. For this reason, choose a spot that can be left undisturbed until the foliage has died back. Informal perennial beds, meadows and under tree canopies are all good choices. |
Click picture to enlarge;) |
| Spring blooming bulbs should be planted in fall. Take a handful of bulbs and cast them over the area you wish to plant. By spreading the bulbs in a random pattern, the planting will look much more natural. |
Click picture to enlarge;) |
| Plant the bulbs with a bulb planter or trowel, three times as deep as they are tall, with the growing point facing up. Give the bulbs a little boost; bone meal can be added to each hole before planting. By the next spring you will have a beautiful, natural looking bed of flowering bulbs that will improve with each passing year. |
Thursday, June 07, 2007
Phase 2 : Naturalizing Bulbs
Outdoor gardening : Phase 1
| Bulb Planting In Layers | |
Click picture to enlarge;) |
| What you need: Bulbs Shovel Bone meal Different sized bulbs require different planting depths. By planting bulbs in layers, you can plant several different types of bulbs together. Dig a hole that is around three times deeper than the height of your largest bulb. |
Click picture to enlarge;) |
| Add a little bone meal to the bottom of the hole. Arrange your largest bulbs in the hole in random fashion, being sure to space the bulbs properly. A good rule of thumb is to allow for a space of two to three times the width of the bulb in between each bulb. |
Click picture to enlarge;) |
| Next, carefully cover the first layer of bulbs with soil. Add enough soil to provide the proper planting depth for the next layer of bulbs. |
Click picture to enlarge;) |
| Add a little more bone meal to the soil, and arrange the next layer of bulbs in the hole. Try not to place them directly on top of the previous bulbs. |
Click picture to enlarge;) |
| Add more soil to the hole, covering the last layer of bulbs. |
Click picture to enlarge;) |
| Place the final layer of bulbs in the hole, a little more bone meal, and fill in the rest of the soil. |
Click picture to enlarge;) |
| If you're planting in well-drained soil, a depth of 3 - 4 times the height of the bulb is recommended. If you're planting in heavy, poorly draining soil, a depth of 3 times the bulb is recommended. |
Ah, Its a long time coming
Sorry, I couldn't update the blog for more than 7 months now. Been a helluva time studying for the examinations. But hey, its holidays now and I'll try to update regularly. Meanwhile, keep an eye out for my bun-gee-pup-ee on the right and give a click on it.
Friday, November 24, 2006
Tips and Tricks - Indoor Gardening
Tips & Tricks
There are many tips and tricks that you should follow when bringing plants into your home, some are common, like knowing how much to water the plant, to how much light it should get. Below you will find a list of some suggestions about caring for your indoor garden.
-
Lighting for the plant. Now this is the first thing that you should consider when starting your inside garden, how much light does the plant need? This is important because most houses wouldn't have enough light to handle a plant that needs a lot of light. So, the lighting in your house becomes essential even before you start your inside garden or bringing any plant into your house, because the amount of light in your house will determine what types of plants would grow there. So make sure to consider this before bringing any plant into your house. You should select plants that require medium to low light, unless you plan on supplying the plant with artificial lighting. Some plants that are medium to low light would be a Boston fern, Philodendrons, etc. Here are a few other tips regarding lighting in the house:
-
During the summer months put the plants outside, this will usually boost up the plant and give it a new spurt of energy
-
Because a plant will turn to the light, you should rotate the plant, this will promote an upright growth.
-
There are a few ways you can tell if your plant is getting enough light or not. If it isn't getting enough light, it usually will have small leaves, thin stems, and the color of the plant will be lighter than usual.
-
Artificial lighting, with a fluorescent lamp, etc, can be used to supplement a house with limited natural lighting.
-
Condition your plants when you buy them. You have to do this because the place where you buy the plant will usually have more lighting than your home and the plant can go into a shock of sorts and lose it's foliage. Now to condition your plant, make sure you give it the maximum amount of light your house has, and then gradually reduce the amount of light to be equal to the spot where you want the plant to end up.
-
-
Watering Plants:
Not every plant has the same needs when it comes to watering, but there are some basic rules you should follow:-
Wet the soil thoroughly, and the water should be able to drain out of the bottom of the pot. How much you water, and how often purely depends on the type of plant that you are dealing with, so read the seeds or ask the person selling you the plant, how much water does this plant require.
-
Now, don't over water, that's probably what kills most plants. If you have too wet of a soil constantly it will lead to problems with the roots. You'll notice that the leaves will become yellow, that's because there is not enough oxygen in the soil because it is too wet.
-
When watering the plants, try to use water that is the same temperature as the room. This will insure that the plant doesn't have any shock from too cold or hot water.
-
-
Temperature:
As with watering, different plants will thrive under different conditions, one of which is the temperature. As a general rule temperatures between 65-75 degrees Fahrenheit, during the day and 10-15 degrees cooler at night. Now this will not cover all plants, but this is the range for most of the house plants. Here are a few more tips to follow:-
The temperature can go up or down by 10 degrees from the ranges above, it will not kill the plant.
-
Rapid changes in temperature, either colder or hotter, can cause damage to your plant.
-
If a plant is grown at a hotter temperature than is needed, it will be small, weak. If it is grown in a too cool temperature the leaves will have a yellowish look and will fall off.
-
-
Pots and Containers:
Make sure that you have a pot that can adequately allow the water to drain out of it. Also, before putting a plant in a pot you have used for another plant, make sure you clean it out. Just incase some disease that may effect the next plant.
-
Humidity:
The level of moisture in the air can also effect how a plant grows. Low humidity, in most plants, not all, will cause dry leaves and curling. Increase the humidity of the room with a humidifier, especially during winter when the heat is on and the humidity drops. You could also spray the leaves with water, but do it in the morning, if done overnight the leaves can rot.
-
Fertilizing:
Once again, this is one of those tips that is based purely on the type of plant that you have, different plants need different levels. Other factors include, how fast do you want the plant to grow, how much sunlight there is, how many times you water it, etc. As a general rule, for plants that are growing very quickly, you should fertilize every 2 to 3 months, but for dormant plants, you shouldn't fertilize at all. Since these are indoor plants, that receive less sun than normal, you really don't have to fertilize them too often. If you see burned or dried leaves, you can have a pretty good guess that the plant has been over fertilized.
Thursday, November 16, 2006
Sedum - Overview, Description and Design Tips
Overview:
Showy Sedum, the taller plants in the genus Sedum, are often taken for granted in the garden, partly because they don’t bloom until the fall, but also because they require so little care from the gardener. Their thick, succulent leaves are able to withstand drought and rainy weather. The flower buds form early and remain attractive well in winter. If the deer didn’t eat them, Sedum would be a perfect plant.
Latin Name: Sedum
Common Name(s): Showy Stonecrop, Border Stonecrop
Zone: Varies with variety from Zone 3 - 10
Size: 6 - 24" H, 12 - 24" W
Exposure: Full Sun / Partial Shade
Bloom Period: Late Summer / Fall
Description:
Border Stonecrop are a small section of the hundreds of species of Sedum. These taller growing Sedum have thick stems, fleshy leaves and tight flower heads that start out looking similar to heads of broccoli. Most are study enough to stand upright on their own, with a few varieties showing a trailing quality suitable for containers. Flowers tend to be in shades of pink and mauve, that start out pale and deepen as they mature. Flower heads are attractive from bud through their dried stage.
Design Tips:
Sedum look especially good in a small mass planting that takes center stage in autumn. Because they look good all season, Sedum are suitable for edging, specimen plants and containers. Smaller varieties are good choices for rock gardens and wall. Sedum make great cut flowers and are popular with butterflies.
Suggested Varieties:
Sedum ‘Autumn Joy’ - Still a favorites because it is such a wonderful, beautiful performer.
S. spectabile ‘Brilliant’ - A clearer pink than most Sedum flowers.
S. ‘Vera Jamison’ - Burgandy leaves and mauve flowers with a trailing habit.
S.’Black Jack’ - Deep burgandy, almost black foliage and strong upright habit.
S.'Cloud Nine' - Variegated Foliage
What 1 Perennial Would You Recommend to New Gardeners?
What 1 Perennial Would You Recommend to New Gardeners?
We’ve all seen the look in a new gardener’s eye when they ask you for advise on what to grow. There’s such a mix of wild hopes and intimidation. There are a handful of plants I consider garden staples. But if I had to pick just one, I think it would be Sedum ‘Autumn Joy’. It’s so easy going and, as you can see, it looks good all the time. Yes, I’m aware the deer like it too. But I’m willing to make the effort to spray. I think it’s worth it.
What about you? I’d like to compile a Top Picks of your recommendations for the novice gardener. Put in your 2 cents in the ‘Comment’ link, below and if you would, mention what area or zone you're gardening in. I know, I know. It’s hard to pick just one. But let’s see what we can come up with.
Next topic, Information about Sedum 'Autumn Joy'
Sunday, November 05, 2006
Palms
Palms
|  | ||||||||||||||||
|

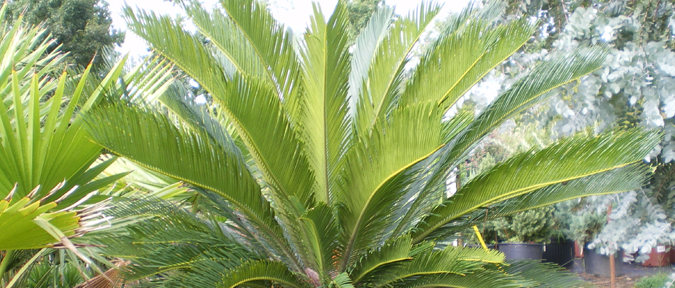
Palms are evergreens, mostly tropical, with wood like stems belonging to the Palmae family. There are about 2800 species and 300 genera of palms. They have an exotic appeal which makes them a perennial favourite. Most palms are like trees with single trunks. In palms, the leaves will develop from a single bud atop each stem, unfolding like an accordion or a fan. Leaf bases encircle the stem, at least early in their development. The stems of mature palms are tough and woody.
The palm leaf consists of a petiole (leaf stem) and blade (the main body of the leaf). Based on their leaf structures, palms are classified into two basic categories; i.e, fan shaped (palmate) or feather shaped (pinnate) compound leaves. Each type have its own kind of structure. In most pinnate palms, the blade is divided into leaflets and they attach to the rachis, an extension of the petiole through the blade.
Most palms grow as single-stem trees, but some develop multiple stems from a single root system. The thickness of the stem ranges from a pencil to more than a meter!
Subscribe to:
Posts (Atom)